Fiber Optic Termination With Adhesive/Polish Connectors

Adhesive/Polish Connectors
Terminating optical fibers by attaching connectors with an adhesive and polishing the ferrules has been used since the beginning of fiber optics. Dozens of other methods have been developed but most have not been widely adopted. You can get prepolished/splice connectors you splice onto the fiber, probably the second most popular termination technique. You can get prefabricated cable assemblies that need no field termination at all, and their acceptance is growing.
But adhesive/polish connectors are preferred because of their lower loss and higher reliability. Criticism of their termination times ignore the total process of terminating a fiber optic cable. The total time involved in termination includes getting to the work site and setting up, preparing the cable, making terminations, testing, cleaning up and leaving. Connectors that offer faster termination of an individual fiber don't save any time on the rest of the processes, making time savings minimal. Even adhesive curing time becomes irrelevant when several fibers are being terminated, as each termination can be allowed to cure while other fibers are being terminated.
Even polishing time is short. In fact, many installers make the mistake that polishing more is better, when in fact over-polished connectors will generally show higher loss. Learning to polish the connector the least amount is best, and using a microscope to inspect the polish is advised.
Adhesive Choices
There are three general categories of adhesives used in fiber optics, epoxy, Hot Melt and anaerobic adhesives. Some epoxies can be cured quickly in a oven at about 90-100° Celsius while others are designed for room temperature curing which typically takes 8-12 hours. Hot Melt (a 3M exclusive) uses an even hotter oven at about 200° Celsius to melt the adhesive so the fiber can be inserted and the allowed to cool to set the adhesive. (The epoxy and Hot Melt ovens are not interchangeable - epoxy ovens will not melt Hot Melt adhesive and a Hot Melt oven will ruin epoxies!) Anaerobic adhesives are fast-setting adhesives that can set instantly if an accelerator liquid is used, maybe too fast for some installers!
With all adhesives, one wants to have a reliable adhesion between the fiber and the ferrule. If the adhesive fails, not unusual when connector ferrules were made of metal, the fiber will "piston" - sticking out or pulling back into the ferrule - causing high loss and potential damage to a mated connector.
The Termination Process
For all adhesive connectors, the process is similar:
Prepare the cable
Strip the jacket off the cable, exposing an adequate length of buffered fiber for processing
Cut the aramid fibers and other strength members to the proper length
Strip the individual fiber
Prepare the adhesive
Mix epoxy, fill syringe, inject into connector
Apply anaerobic adhesive to fiber or inject into connector
Heat Hot Melt connectors to melt adhesive
Insert fiber into connector
Cure adhesive
Scribe and break (cleave) fiber protruding from connector ferrule
Air polish to grind fiber down to near end of ferrule
Finish polish with polishing film on top of resilient pad using a polishing puck to hold the fiber perpendicular to the polishing film
Inspect
Test
Epoxy/Polish Termination
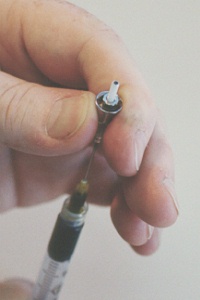
Every factory-terminated connector uses the epoxy/polish method of termination. It’s a matter of performance, reliability and economics. The epoxy/polish type of connector provides the lowest loss, greatest reliability, highest yield and lowest cost of any termination type. Another big advantage is the small bead of epoxy on the end of the ferrule (blue dot in the photo) makes polishing easier - practically foolproof.
For singlemode fiber, it is virtually the only method of termination that can provide the precise end finish necessary for the low loss and minimal reflectance required for high speed networks. Almost all singlemode connectors are factory-made with epoxy adhesives and machine polishing. Field terminations are accomplished by fusion splicing a factory-made pigtail onto the cable. Field terminations of singlemode are possible using anaerobic or prepolished/splice connectors, but the higher reflectance common with field terminations are likely to be a problem with today’s multi-Gigabit networks.
Termination of multimode connectors is much less critical, especially where reflectance is concerned. But low loss is still a big issue, especially since multimode premises networks often have several patch panels and patch cords between transmitters and receivers and the maximum tolerable link loss for high speed networks like gigabit Ethernet and Fibre Channel is quite low. If an installed network has two intermediate connections and two patchcords with all connectors near the maximum loss allowable in the TIA 568 standards – 0.75 dB – the link loss will exceed the maximum loss in some gigabit network standards.
With typical losses of field-terminated epoxy/polish connectors around 0.1-0.3 dB, meeting loss budgets is easy. A well-trained technician using a portable epoxy curing oven can get almost 100% yield also, reducing the cost of replacing connectors that fail insertion loss tests. The real secret behind the epoxy/polish connector is the small bead of epoxy that you create on the end of the connector ferrule when you inject the adhesive. It creates a hard extension of the ferrule that holds the fiber perfectly for quick and easy polishing.
Virtual Hands-On Epoxy/Polish Termination
Hot Melt Adhesive Termination
Another choice is the 3M Hot Melt. In the Hot Melt connector, the adhesive is already in the connector. The connector is heated in a very hot oven (about 200 deg C) so the adhesive melts. The connector is removed from the oven and the prepared fiber inserted into the connector. The connector is allowed to cool a few minutes and then it is cleaved and polished just like a epoxy adhesive connector. The adhesive provides a nice hard bead for polishing and it has the advantage of being reusable - if you mess up the termination, you can reheat it in the oven and try again.
Virtual Hands-On Hot Melt Adhesive Termination
Anaerobic Adhesive Termination
Anaerobic adhesives set much quicker than epoxy and are neater too. Plus these adhesives are much less expensive than epoxy. A popular adhesive is Loctite 648. The optional accelerator for it is Loctite 7471 or 7649.
Several methods are used for applying an adhesive and some use an “accelerator” or chemical that makes the adhesive set instantaneously. These methods are:
- Inject adhesive into the connector and dip the prepared fiber end into the accelerator before inserting it in the connector. One must work quickly as the adhesive sets in 30 seconds or so, so if trouble getting the fiber into the connector is encountered, the adhesive may set before the fiber is fully inserted.
- Inject adhesive into the connector and then insert the prepared fiber end into the connector. Spray or drop the accelerator on the protruding fiber and move the fiber back and forth to spread the accelerator inside the connector ferrule. It should set in ~30 seconds.
- Wipe the fiber with the adhesive and insert it in the connector. With no accelerator, the adhesive will set in 4-5 minutes and be much stronger. If instant adhesion is required, spray or wipe accelerator on the protruding fiber as above.
Anaerobic connectors require more skill in cleaving and polishing, since they do not have the adhesive bead on the end of the ferrule that makes an epoxy/polish or Hot Melt connector so easy to use. Thus, anaerobic terminations usually have a slightly lower yield.
Virtual Hands-On Anaerobic Adhesive Termination
Videos on termination on the FOA Channel on 
Termination Time And Cost
What about the other types of connectors or processes that promise faster and easier termination? Well, the time it takes to put the connector on the fiber is not the only time to consider. The installer must set up at the work site, install the patch panel and any other hardware and prepare the cable for termination before actually putting the connector on the fiber itself. After termination, the cable must be connected into the patch panel and tested then bad terminations fixed and retested. After all connectors are tested good, the work area must be cleaned up and all the tools repacked.
Demonstrations of quick-connect connectors show how easy it is to put a connector on one fiber in a minute or less. But they forget to mention all the other activities at the work site, like setup and cleanup time, preparing cable ends for termination and they only consider one connector. If you are terminating, for example, a 24 fiber cable with epoxy/polish connectors using a curing oven in a “production line,” the effective termination time is only a couple of minutes per connector. You inject epoxy into several connectors at one time, strip a fiber and attach a connector, then put it in the oven to cure for 5 minutes or so. While it cures, you attach more connectors. By the time you fill the oven up, the first one is cured and ready to polish. If you have more to do, you replace it in the oven with another ready to cure until all are cured, then you polish them all at once, at about a minute each. With this process, the epoxy curing time becomes irrelevant.
Which brings us to the bottom line. Connectors for epoxy/polish or anareobic terminations are available today in quantity for not much over $1 each. Quick connect connectors sell for 5 to 15 times more, depending on the type and quantities. When the total cost of termination is properly calculated, including the realistic time necessary to set up before making terminations and cleaning up afterwards, saving a few minutes labor per connector may not offset the higher cost of the connector itself.
So are epoxy/polish connectors obsolete? Not on your life. Lots of smart contractors still use them and end users still specify them, knowing they are still the highest quality solution to fiber optic termination.
Table of Contents: The FOA Reference Guide To Fiber Optics
|